Websocket Device Manager
The following feature is an aspect of the Buttplug Reference implementation, and is not part of the specification for the protocol. Therefore, this information may change in relation to revisions of the Buttplug Library rather than the protocol specification.
The Websocket Device Manager (WSDM) takes advantage of the User Device Configuration File (UDCF) to allow for dynamic addition of devices to Buttplug. This allows users to connect devices that may not be supported directly by the library, such as DIY systems or devices that are difficult to obtain. The WSDM also allows users to build simulated devices in software in whatever language they please (that supports websockets), for testing and prototyping purposes.
This section outlines the requirements for adding device configurations to Buttplug for use with the WSDM, as well as describing the handshake protocol used with the system. It will end with a full example script for building a simulated device in Python, and testing the script with Intiface Central or Intiface Engine.
WSDM Functionality
Here's an overview of how the WSDM works:
- Creation of the WSDM allows for setting the host and port that the WSDM server will listen on.
- The WSDM is added to the ButtplugServer during the Buttplug server configuration step.
- When the Buttplug server is started, the WSDM will start its own server, and listen on the specified host/port combination.
- At this time, a device can be connected to the WSDM server port.
- Devices will need to follow the handshake protocol to identify themselves to the system.
- Devices can connect to/disconnect from the WSDM *outside of StartScanning/StopScanning pairs. DeviceAdded events may fire at any time.
- Once the device is connected and emitted via DeviceAdded, it can be used normally by Buttplug Clients.
- Communication with the device will use the same protocol as any original device would use, so any expected returns must be provided.
Outside of the initial handshake, which is text, all information sent and received by a Websocket Device will use binary format websocket messages. As Buttplug usually has to format strings into byte arrays when sending to hardware, that expectation is continued with websocket devices, even when they may send text back and forth as part of their protocol.
Extending Protocol Configurations for the WSDM
Before connecting a Websocket Device, it must be added to the User Device Configuration File. This allows the user to define the protocols that will respond to websocket device connections.
Any protocol that already exists in the DCF can be extended in the UCDF to use the websocket system.
A websocket specifier is used, which will contain the possible identifiers of the connecting
device. Unlike bluetooth name definitions, websocket names cannot use wildcards.
For a running example through this section, the Lovense protocol will be extended to handle a websocket device connection, starting with a completely clean UCDF.
{
  "version": {
    "major": 2,
    "minor": 6
  },
  "user-configs": {
    "specifiers": {
      "lovense": {
        "websocket": {
          "names": ["LVSDevice"]
        }
      }
    }
  }
}
This is all that is contained in the UCDF for the moment, but will now allow creation of a new websocket device that will communicate using the Lovense Protocol.
Connecting to the Websocket Device Manager
With the protocol extended to expect websocket devices, specific device information can now be added. For simplicity, the device added in this example will just have a single vibrator, emulating a Lovense Hush device (lol, buttplugs).
The WDM handshake expects as single JSON packet as its first received data, in the following format:
{
  "identifier": "",
  "address": "",
  "version": 0
}
identifershould match the identifier of the originating device to map to the connecting device. The Lovense Hush uses the identifier Z.addressis an arbitrary string used to identify the device across sessions. It should be set to a random string.versionis the version of the WDM protocol being used. As of this writing, the protocol is on version 0. Any increment in this protocol should be considered to be backwards incompatible, and connecting systems may be rejected if they do not match the version number.
For the Lovense example, the generated JSON block would look like this (with the address mapping to the expected output of the Lovense DeviceType; protocol command):
{
  "identifier": "Z",
  "address": "8A3D9FAC2A45",
  "version": 0
}
This JSON block should be the first thing sent to the WSDM server. After this, one of two things will happen:
- If the WSDM server accepts the device, all further communication will be in the context of the requested protocol, from its initialization phase.
- If the WSDM server rejects the device, the websocket is closed with an error reason.
Proper handling of the initialization phase for a protocol will be required. Check STPIHKAL for info on the initialization phases of certain protocols.
WSDM Python Example
The following code is a full python example of a WSDM setup. The python script:
- connects to the WSDM server
- identifies as a Lovense Hush to the WSDM
- sends back a valid
DeviceType;respond to handle the lovense protocol initialization - prints out any vibration command send
- responds to battery level queries
# TODO: WebSocket device manager example for Buttplug v4
# This is a stub file - real example coming once client library support is implemented
Running the WSDM Python Example
A UDCF will need to be created with the following info (this file is also in the examples/python directory of the docs repo):
{
  "version": {
    "major": 2,
    "minor": 6
  },
  "user-configs": {
    "specifiers": {
      "lovense": {
        "websocket": {
          "names": ["LVSDevice"]
        }
      }
    }
  }
}
To run the example above using Intiface Engine, build or download the executable for your platform and run:
intiface-engine --websocketport 12345 --use-device-websocket-server --user-device-config-file [path to the UDCF created above]
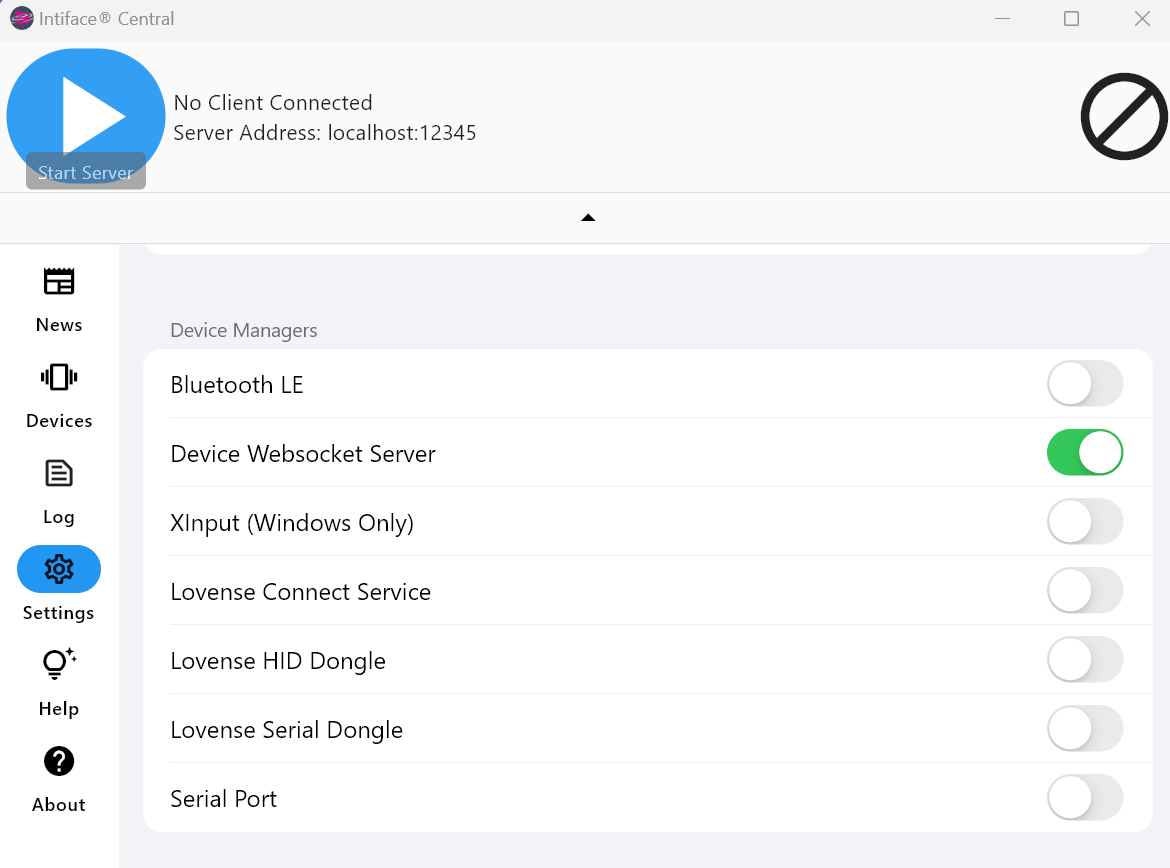
To run the example above using Intiface Central, the UDCF will need to be copied to the Intiface Central configuration directory.
As of this writing, Intiface Central is currently lacking a User Device Configuration UI. Getting this added is one of the top priorities for development, but for now, manual file editing and moving is required.
The Intiface Central Configuration directory on desktop platforms is as follows:
- Windows:
C:\Users\[UserName]\AppData\Roaming\com.nonpolynomial\intiface_central\config\buttplug-user-device-config.json - macOS:
/Users/[UserName]/Library/ApplicationSupport/com.nonpolynomial/intiface_central/config/buttplug-user-device-config.json
After the UDCF is copied, open Intiface Central and make sure the Device Websocket Server is turned on in the settings panel.